Whether transforming a multifunctional commercial space or a dynamic shared environment, managing complex projects requires solutions that simplify the installation process.
Modular carpets excel in their ease of installation without requiring adhesive across the entire surface. This innovative approach not only ensures exceptional flexibility but also allows valuable time savings, all while maintaining durability.
Let us guide you through the essential steps to achieve a flawless glue-free installation with ease and precision.
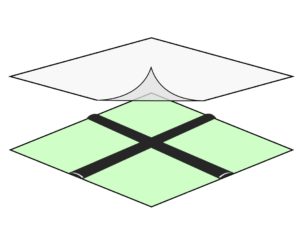
For a truly seamless and glue-free installation, MaxTab technology is a leading solution that simplifies every step of the process. With its patented design, these durable and stable adhesive tabs enable efficient floating installations for our 50cm x 50cm tiles and 25cm x 100cm planks. Practical and easy to use, they minimize mess while providing optimal flexibility for installation, maintenance, repairs, or partial replacement of tiles or planks.
Key benefit : Using MaxTab can result in cost and time savings of up to 50% compared to other flooring installation methods.
Before starting your project, make sure that you have the following tools at your disposal:
With the necessary tools in hand, you can begin the installation. However, be sure to carefully plan ahead the required quantities of tiles and planks. For beginners, it may be wise to have extra material available in case of errors or adjustments.
1. Prepare the Space
Begin by thoroughly cleaning the subfloor to remove any dirt or dust. If needed, fill any holes with a cement-based filler to create a smooth, even surface. Allow the cement to dry completely before proceeding with the installation.
2. Mark the Center of the Room
Starting from the center of the room is the easiest way to ensure a consistent installation when reaching the walls. Identify the midpoint of each wall and mark it on the base surface. Using a chalk line, draw a line across the floor connecting the marks on parallel walls. Use a straight edge to verify that the lines intersect at a 90-degree angle when connecting opposite walls. These lines will precisely pinpoint the center of the floor.
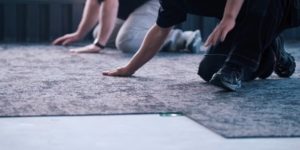
3. Install the Tiles/Planks
From the center point, lay out the carpet tiles in your desired configuration without using adhesive. Floating installations require a 1/8’’ gap around the perimeter to accommodate potential expansion and contraction of the carpet. Starting from one wall, position the tab (sticky side up) beneath the tiles, cutting them in half only for tiles adjacent to walls.
4. Smooth the Finish
Once the tiles are installed, use a porcupine roller to ensure proper bonding and optimal fiber blending. For a neat finish, use a pair of duckbill scissors to trim any visible fibers.
Curious to learn more? Explore our complete installation guide which offers more information on our methods that simplify your projects.
Flooring installation is not merely a fundamental aesthetic element in architecture and interior design projects; it is a strategic and functional solution that enhances the level of comfort, durability, and adaptability. With unparalleled versatility, modular carpet is an ingenious and creative way to meet the evolving demands of spaces while adhering to the highest quality standards.
Whether through glue-free, roll-on, or full spread installations, modular carpets transform environments with efficiency and sophistication.
Our expert installer will be delighted to provide personalized support. Contact our team at in**@************ts.com for professional advice tailored to your installation needs.